
Edit 2023-11-02: I've since upgraded to a new solar system, so I no longer maintain the logging script mentioned in this post. The archived code repository is still on GitHub for other people to fork.
We've had a 3kW solar array on top of our house ever since we built it about 6 years ago.

It came to our attention recently that one of our 12 solar panels had shattered glass (seemingly for a while), something you can even see from the latest Google Maps satellite imagery.

Surprisingly, when we had some guys out to replace it, it is pretty much impossible to source another panel with a similar voltage and current that wouldn't drastically affect the rest of the array. So we ended up just removing the broken panel.
It came to mind that, other than random glances at the inverter's basic LCD display, I had no idea if our solar system is performing as it should. As our inverter (a Samil Solar River SR3K3TLA1) is an old and fairly basic model, it doesn't have fancy wireless/network logging or monitoring, and pretty much only records the total output for the current day (which is reset each day), and the lifetime total output of the inverter.
The only method of external monitoring is through a serial data connection over RS485 or RS232, i.e. the good old serial port that computers have largely ditched for well over a decade.
Sensing the opportunity for a project, I googled around for some monitoring mechanisms. The most popular was having a small computer hooked up to the inverter using a serial cable, and then uploading the data to the online PVOutput service for storage and analysis.
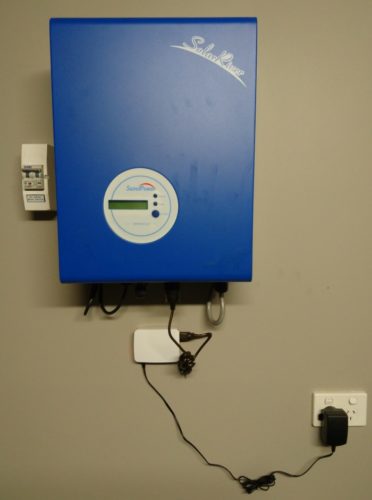
I've been waiting to have a decent use case for doing something with a Raspberry Pi, and this seemed a perfect fit: something extremely low-powered that I could stick on the wall (our inverter is inside our garage). I ordered the Raspberry Pi starter kit (which includes the official case, power supply, and SD card in addition to the Raspberry Pi 3 Model B) from Core Electronics, and it was delivered a few days later. The last piece of the pie (ha 😉 ) was a basic serial to USB cable.
For the script itself, I found a lot of references to a perl script from a forum called Solar Freaks, but the website seems to now be defunct. Luckily, some kind person had uploaded the script onto GitHub, so I promptly forked it and went to work.
I have to acknowledge this fantastic post for tips on how to use this script for a Samil inverter, as well as modifying it to run as a cron instead of a looping program. Most of the changes recommended there I have made in my own GitHub repository for the project.
You can find my fork on GitHub.
For a similar Samil inverter, the latest commit from my fork should work fine on a Raspberry Pi, although there are also config files included for some other manufacturers' inverters.
Here are the steps I needed to do to get it working (last tested on Raspberry Pi OS 10 Desktop (Buster)):
- On your Raspberry Pi, install the required Perl modules (Perl should already be installed by default on Raspberry Pi OS).
- Open the Perl CPAN module manager:
sudo cpan
- Install the modules (this might take a while):
install AppConfig Device::SerialPort HTTP::Request::Common LWP::UserAgent
- Exit CPAN to return to the bash terminal:
exit
- Open the Perl CPAN module manager:
- Download the script from my GitHub repository and extract it to your Raspberry Pi home directory. Make sure that the extracted folder's name doesn't include
-masterat the end.The script assumes that it resides in/home/pi/inverter_monitor/, but you can put it anywhere and change the paths inconfig.ini,inverter.pl, andrunSolarStats.sh(there should only be a few mentions of the path). - In
pvoutput.pl, insert your own PVOuput user account details for your system ID, inverter serial number, and API key:my @PVOUTPUT = ( { SERIAL_NUM => "<REPLACE WITH YOUR INVERTER SERIAL NUMBER>", API_KEY => "<REPLACE WITH YOUR PVOutput API KEY>", SYSTEM_ID => "<REPLACE WITH YOUR PVOutput SYSTEM ID>", }, ); - Run the script and see if it works:
bash runSolarStats.sh
- Create a cron so that the script runs according to your desired schedule. I used the following which runs it every 5 minutes between 4am and 8pm:
*/5 4-19 * * * bash /home/pi/inverter_monitor/runSolarStats.sh
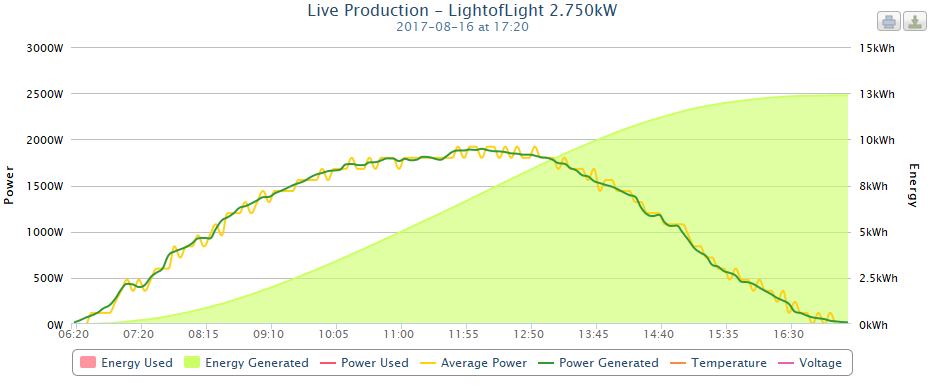
That should be it! You can see my system's live output data on PVOutput.org. Below is a graph of yesterday's output.
Let me know if this helps you, and feel free to fork my version of the script for your needs! 🙂
Hi Lucas,
Thanks so much for your informative post!
At Christmas 2017 I have a very similar epiphany and have sourced code to connect my Australian Orion 2.5 kW (aka Phenotexic) inverter to the Raspberry Pi via the RS 232 port/USB.
Have had great success.. to a point.
I am now running your run SolarStats shell and that is creating nice current logs and cumulative data tables at 5 minutely intervals.
My problems are now uploading to the PV output.org site. How do you run the live feed to the site ( I have configured the pvoutput.pl with my API and id number.) When I run this in the terminal it seems to indicate I had an unauthorised number near the serial number ( line 88) or there abouts.
I then added the pvoutput file to the run stats to see if I could drive 5 minutely uploads. The "current" file in my log indicates that it has run the file...but my outputs in pv output look odd.
Do you have any other comment son how you achieved the pvoutput link?
I have also been trying to get the rrdtool to work and have struggled with that as well.
I will keep trying, but i just thought I would see if you had any other advice or recollections on how you made this work.
Cheers - and thanks again.
Chris
No worries, Chris! Glad you found it useful!
Line 88 of pvoutput.pl is checking the serial number of the inverter, which you need to specify on line 59. Are you sure you have provided the inverter serial number correctly on line 59? (you will also need to specify your PVoutput API key and System ID on lines 60 and 61 respectively).
The inverter serial number is mainly if you are running multiple inverters, but even if you are running one inverter, the script still needs you to provide it.
I hope this helps!
Thanks very much for this. I have an old Samil like yours, an older 2k2kW version.
Have you looked into running this off a ESP8266? Would be awesome to port this project over to be able to use on a Samil (I would but have no idea where to start!):
https://github.com/jantenhove/GoodWeLogger
Thanks, Andrew! I haven't had any experience with an ESP8266, but if it can run a Linux-like OS, it should be able to use my version of the script as long as Perl can run on it.
You could try modifying the script that you link: as long as you can match the specific values that the inverter outputs via the serial cable to a value that PVoutput uses, it _should_ be possible.
But that probably sounds a lot easier than what might be required (it almost always is... 🙂 )
No worries! BTW, have you tried comms over RS485 on the Samil? I’m struggling to get anything from that interface for some reason. I wonder if it has to be ‘enabled’ in some way?
No, I've never used the RS485 myself. I don't think it would need to enabled, there's not much scope for configuration on these old Samils.
This manual (https://gold-coast-solar-power-solutions.com.au/wp-content/uploads/2016/07/Samil-SolarRiver-user-manual.pdf) seems to suggest that RS485 is for milti-inverter monitoring, but I'm not sure myself.
I’ve managed to get some output over RS485. I had been struggling for a few days, using a USB TTL serial adaptor and a TTL to RS485 module. Basically going from 2 wire to 4 wire on the Samil. I finally realised I had to tie both +ve and -ve wires on the 4 wire to allow 2 wire comms.
Now to try and adapt the fellas code to suit the Samil and I’ll have a ESP8266 solution with MQTT to integrate with my smart home build!
Hi, I know this was a while ago however I am struggling to get comms working on the RS485. I have combined pins 1 with 3 and 2 with 4 and attached to A+ & B+ accordingly. I have an Elfin EW11 which is the 2 wire. Comms port set to 9600,8,1 none and half duplex flow control. Elfin is exposed on network as a Tcp Server. Can connect and send to EW11. It states it is sending comms to the comm port but nothing is returning? Any help gratefully received!
Hi Ian,
What is your physical connection? Mine is still running after all these years as follows:
Pi > USB-TTL adapter > TTL-to-RS485 module > Samil RS485 port
If you’re going straight from Pi to a RS485 adapter then I’m not sure if that would work as expected.
Okay, could explain it. I was hoping the elfin ew11 would act as the middleware. So PI->top server side of elfin->elfin rs485->SOLAR RIVER 3000-TL
Nice work!
If it helps, below is a log from my script if it helps you match up the output data to the values you want (inverter serial number is redacted). You can see at the bottom that the script only sends a few data points to PVoutput.
Hmm interesting, so only time, date, etoday and pac values by the look of it, much less than I thought!
Thanks Lucas, will see how I go with this code. 🙂
Hi Lucas,
Thanks for your site, an interesting article. I'm trying to do similar, using your instructions as guidance. I an absolute newbie wrt raspberry pi and linux.
I have a query.
I have followed your page and have a pi zero w attached to the inverter. However, when running the bash command the following error results:
runSolarStats.sh: line 1: /home/pi/inverter_monitor/logs/current.txt: No such file or directory
Can you point me in the right direction to this little problem?
Thanks in advance.
Rob
Hi Robert!
Hmmm, you might need to manually create the directory it is trying to write the logs to (/home/pi/inverter_monitor/logs/). Try creating that directory and running it again.
Hi Lucas,
Thanks for the post, changed over to the pi today to replace an old Asus eeepc that was doing this. Your instructions worked like a charm and it working happily, whilst drawing less power
Brad
Hi Brad!
Awesome, I'm glad it worked for you, thanks for letting me know! 🙂
Great work on this blog Lucas!
I have only just discovered this after my EEEpc finally failed with HDD issues.
I too have a "newbie question" that I am not sure of.
In the following lines, what option is replaced with the serial number?
Options
1. SERIAL_NUM => "",
2. SERIAL_NUM => "S501xxxxxx",
3. SERIAL_NUM => S501xxxxxx,
4. S501xxxxxx => "",
I have found some information on-line but not in this application!
Cheers
Andy
Sorry Lucas,
That previous Question did not appear exactly as I typed it.
Do I need to include all of the punctuation or just replace the text?
I hope this makes sense!
Cheers
Andy
Hi Andy!
Thanks a lot!
To answer your question, the format should be like:
SERIAL_NUM => "S501234567",
That's my problem, I wasn't including the inverted commas!
Just another thing that may help others, I had to modify some of the files where it referred to "inverter_monitor" to "inverter_monitor-master". Not exactly sure if it was something that I cause during my learning process but was quite satisfied when I discovered & fixed it.
Thanks again for all of your help!
Andy
Great to hear, Andy! Hmm, it looks like GitHub is appending the name of the version branch (master) to the folder. You can just rename the folder if that is easier 🙂
Hmm, change 1 file name or change many file names!
D'oh!
Hi!
Thank you for this project! I dodnt need much to bring it to work.
I have opne little Problem:
Every few Minutes, i cannot connect. I didnt find out why.
Any Idea?
Michael
* Data:
TEMP : 59.6 deg C = Internal Temperature
VPV1 : 286.8 V = Panel 1 Voltage
IPV1 : 10.9 A = Panel 1 DC Current
ETOTALH : 0 kWh = Accumulated Energy (high bit)
HTOTALL : 38235 hrs = Working Hours (low bit)
MODE : 261 = Operating Mode
ETODAY : 29.52 kWh = Accumulated Energy Today
HTOTALH : 0 hrs = Working Hours (high bit)
ERR_GV : 0 = Error message: GV fault value?
ERR_GF : 0 = Error message: GF fault value?
ERR_GZ : 0 = Error message: GZ fault value?
ERR_TEMP: 0 = Error message: Tmp fault value?
IAC : 13.5 A = Grid Current
VAC : 237.7 V = Grid Voltage
FAC : 50.04 Hz = Grid Frequency
PAC : 3306 W = Output Power
ERR_PV1 : 7 = Error message: PV1 fault value?
ETOTALL : 4681 kWh = Accumulated Energy (low bit)
ERR_GFC1: 0 = Error message: GFC1 fault value?
ERR_MODE: 0 = Error mode?
Logging to: /home/pi/inverter_monitor/logs/inverter_S50106L009_20190501.csv
tail: current.txt: Datei abgeschnitten
Starting up at 01/05/2019 17:21:03 running on linux ...
Initialise Serial Port... port = /dev/ttyUSB0
Send -> req init inverter: 55aa000000000004000103
Send -> req serial: 55aa0000000000000000ff
Waited 5 seconds and never saw 55aa0000000000800a
noTalks=1, reInits=0.
Sleeping: 10 secs as at 01/05/2019 17:21:09 ...
Re-Init attempt 1...
Starting up at 01/05/2019 17:21:19 running on linux ...
Initialise Serial Port... port = /dev/ttyUSB0
Send -> req init inverter: 55aa000000000004000103
Send -> req serial: 55aa0000000000000000ff
Waited 5 seconds and never saw 55aa0000000000800a
noTalks=1, reInits=1.
Sleeping: 10 secs as at 01/05/2019 17:21:24 ...
Re-Init attempt 2...
Starting up at 01/05/2019 17:21:34 running on linux ...
Initialise Serial Port... port = /dev/ttyUSB0
Send -> req init inverter: 55aa000000000004000103
Send -> req serial: 55aa0000000000000000ff
Waited 5 seconds and never saw 55aa0000000000800a
noTalks=1, reInits=2.
tail: current.txt: Datei abgeschnitten
Starting up at 01/05/2019 17:22:03 running on linux ...
Initialise Serial Port... port = /dev/ttyUSB0
Send -> req init inverter: 55aa000000000004000103
Send -> req serial: 55aa0000000000000000ff
Waited 5 seconds and never saw 55aa0000000000800a
noTalks=1, reInits=0.
Sleeping: 10 secs as at 01/05/2019 17:22:09 ...
Re-Init attempt 1...
Starting up at 01/05/2019 17:22:19 running on linux ...
Initialise Serial Port... port = /dev/ttyUSB0
Send -> req init inverter: 55aa000000000004000103
Send -> req serial: 55aa0000000000000000ff
Waited 5 seconds and never saw 55aa0000000000800a
noTalks=1, reInits=1.
Sleeping: 10 secs as at 01/05/2019 17:22:24 ...
Re-Init attempt 2...
Starting up at 01/05/2019 17:22:34 running on linux ...
Initialise Serial Port... port = /dev/ttyUSB0
Send -> req init inverter: 55aa000000000004000103
Send -> req serial: 55aa0000000000000000ff
Waited 5 seconds and never saw 55aa0000000000800a
noTalks=1, reInits=2.
tail: current.txt: Datei abgeschnitten
Starting up at 01/05/2019 17:23:03 running on linux ...
Initialise Serial Port... port = /dev/ttyUSB0
Send -> req init inverter: 55aa000000000004000103
Send -> req serial: 55aa0000000000000000ff
Waited 5 seconds and never saw 55aa0000000000800a
noTalks=1, reInits=0.
Sleeping: 10 secs as at 01/05/2019 17:23:09 ...
Re-Init attempt 1...
Starting up at 01/05/2019 17:23:19 running on linux ...
Initialise Serial Port... port = /dev/ttyUSB0
Send -> req init inverter: 55aa000000000004000103
Send -> req serial: 55aa0000000000000000ff
Waited 5 seconds and never saw 55aa0000000000800a
noTalks=1, reInits=1.
Sleeping: 10 secs as at 01/05/2019 17:23:24 ...
Re-Init attempt 2...
Starting up at 01/05/2019 17:23:34 running on linux ...
Initialise Serial Port... port = /dev/ttyUSB0
Send -> req init inverter: 55aa000000000004000103
Send -> req serial: 55aa0000000000000000ff
Waited 5 seconds and never saw 55aa0000000000800a
noTalks=1, reInits=2.
Hi Michael!
Sorry for the delayed response, I've been in hospital since last week :(.
I'm not sure what could be causing that... it looks like it can't see the inverter over the serial port when it's trying to connect. Do you have another USB-to-serial cable to to test with?
It's weird that sometimes it works and other times it doesn't.
Thanks for your script, working perfectly here.
Some info that may help others:
I connected via the rs485 port, which on the samil means twisting the tx+ and rx+ together, and also twisting the tx- and rx- together as well. Using a cheap usb-rs485 converter, connect the two twisted positives to the A, or + side of the adapter, and connecting the two negatives to the B, or - side.
Your script opens USB0 perfectly, and communicates no problem.
I also tried connecting using all four wires as an rs422 connection, as the samil appears to have the correct 4 wires (tx+,tx-,rx+,rx-). It wouldn't connect, so twisted the wires back togther, and went back to rs485.
Many thanks.
Great to hear you got RS485 working, Phil! 🚀
It's only been running 24 hours, but it got me wondering if the old daily files are deleted? It won't take long to fill a small sd card. I'll keep my eye on it, and if necessary, create a cronjob delete.
No, there is no removal of log files. My logs average about 500KB/day, so it would take a while to fill up my Pi's 16GB SD card 😁
Hi again,
I created a cronjob that might be of use to others.
Run crontab -e and add this line to the bottom of the file (leave a space between it and the preceeding line):
0 22 * * * find /home/pi/inverter_monitor/logs/ -depth -mindepth 1 -mtime +3 -delete
That will run at 22:00 hours every day, and delete files older than 3 days.
Hope this is useful?
Thanks for the script Lucas, working perfectly.
Good day,
Will this work on older Raspberry’s?
Like the Model 2 B+?
Regards
Should run on any Pi. I’m using this with a first gen Pi.
Thanx! Will let you know the end result
Yep, the script should work on any Pi that you can run Raspbian+Perl on and can connect a serial port to (e.g. using a serial-to-USB cable)! 👍
Hello again,
I've been trying to work out if I could add the panel voltage to the uploaded data. I'm a complete noob at coding, but it does appear that the panel voltage is drawn from the samil inverter (ie VPV1 : 286.8 V = Panel 1 Voltage). I don't want to bork the script by dropping the wrong code into it. Is this possible, has anyone got any pointers?
Thanks in advance.
Phil
Hi Phil,
It looks like it should be possible (and probably relatively easy 🚀). It looks like the upload script is already being fed the voltage data, so we should be able to just edit a few lines to make it upload it to PVOutput.
I haven't tested it myself, but hopefully the changes to the
pvoutput.plfile shown here should work.You can either apply those few changes manually, or download/copy the whole changed file here. (Note that if you download the whole file, you'll need to re-add your PVoutput configuration to it.)
It threw an error:
Global symbol "$voltage" requires explicit package name (did you forget to decla re "my $voltage"?) at /home/pi/inverter_monitor/pvoutput.pl line 101.
Global symbol "$voltage" requires explicit package name (did you forget to decla re "my $voltage"?) at /home/pi/inverter_monitor/pvoutput.pl line 102.
Execution of /home/pi/inverter_monitor/pvoutput.pl aborted due to compilation er rors.
Hadn't declared "my $voltage"
Added this underneath the declarations, all working perfectly:
my $voltage = $ARGV[5];
Results here:
https://pvoutput.org/intraday.jsp?id=84241&sid=74694
Thanks for your help Lucas, you're a star.
@Phil, are you sure you added the new line on line 48 highlighted here?
Edit: it looks like you found it. Awesome! 😁
Followed all the steps, now testing:
bash runSolarStats.sh
Can't open /dev/ttyUSB0: No such file or directory at /home/pi/inverter_monitor/inverter.pl line 857.
Is that because I do not have anything connected yet? So it will work when I connect my Solar Inverter to the Pi?
Also, what is the exact procedure for creating a cron job deleting the log-files. Im a noob 🙂
Already figured out how to create cronjobs, google is my friend 🙂
Leaves the first question. I hope to connect to my inverter this evening.
Hi Jacob,
I tested my setup before the USB dongle arrived, and it threw the same error. The script is looking for USB0, and can't find it (presumably because you've not plugged it in yet?).
When my adapter arrived, I plugged it in, and it worked straight away.
Phil
Ok, thnx for answering. When testing there was nothing plugged in. Finished the install of my PV setup this evening. Will find out if the setup is working tomorrow.🌞
Sadly it's not working, no data in PVoutput. Checked the inverter before I left home and it's generating. Unable to debug because I'm not at home and no portforwarding to ssh, will have to debug later. Will come back here for further help I'm afraid.
Keep up the good work!
Looks like the serial to usb connection to the Pi is working and also the cronjobs to get the data from the inverter. Seeing this kind of data in 20200527-output.txt:
Send -> req data as at 27/05/2020 08:35:08 : 55aa000000010102000103
Recv "S23143X099"
Do I need to set something in PVoutput?
Can someone point me in the right direction?
@Jacob Have you edited pvoutput to add your user details?
It's step 3 in the instructions above. I got my inverter serial number off the box the inverter came in. To get your api key and system ID, log into your pvoutput.org account, click settings, scroll to the bottom, and they are listed there. If there is no api key listed, click the new key button, and it will generate one for you. System ID is at the very bottom next to your username. Copy and paste those into pvoutput.pl, save it, and give that a try.
I use winscp to edit the file.
Here's mine (for security, I've replaced most of the characters):
# Array of Hashes of pvoutput information for each inverter - add more as required (in extra curly braces)
#
my @PVOUTPUT = (
{
SERIAL_NUM => "S3XXXXX003",
API_KEY => "dbee9d8XXXXXXXXXXXXXXXXXXXXXXXXXXXXXXb84",
SYSTEM_ID => "7XXX4",
},
);
Hi guys, thnx for your input. I did edit that file. It was lost in my previous comment somehow. I doublechecked that already. In my case I have 2 PV systems. 1st one is a Solaredge, works fine with OVoutput. For the Samil system, I donated to be able to add a 2nd system to PVoutput. So it has its own systemid that I used.
So Im debugging a bit. Here's some output in logs/current.txt:
Send -> req data as at 28/05/2020 09:55:08 : 55aa000000010102000103
Recv <- 55aa0001000001822801000b8c001f000000140116006400000000000000000000002708fe138e039b000000670000000005c4
* Data:
TEMP : 25.6 deg C = Internal Temperature
VPV1 : 295.6 V = Panel 1 Voltage
IPV1 : 3.1 A = Panel 1 DC Current
ETOTALH : 0 kWh = Accumulated Energy (high bit)
HTOTALL : 20 hrs = Working Hours (low bit)
MODE : 278 = Operating Mode
ETODAY : 1 kWh = Accumulated Energy Today
HTOTALH : 0 hrs = Working Hours (high bit)
ERR_GV : 0 = Error message: GV fault value?
ERR_GF : 0 = Error message: GF fault value?
ERR_GZ : 0 = Error message: GZ fault value?
ERR_TEMP: 0 = Error message: Tmp fault value?
IAC : 3.9 A = Grid Current
VAC : 230.2 V = Grid Voltage
FAC : 50.06 Hz = Grid Frequency
PAC : 923 W = Output Power
ERR_PV1 : 0 = Error message: PV1 fault value?
ETOTALL : 10.3 kWh = Accumulated Energy (low bit)
ERR_GFC1: 0 = Error message: GFC1 fault value?
ERR_MODE: 0 = Error mode?
Logging to: /home/pi/inverter_monitor/logs/inverter_S23143A070_20200528.csv
PVOUTPUT as at 28/05/2020 09:55:09 ...
ran: /usr/bin/perl /home/pi/inverter_monitor/pvoutput.pl 1000 923 20200528 09:55 S23XXXX70 295.6 25.6
Serial: S23XXXX70 as at: 20200528 09:55
Now: 923 W
Today: 1000 Wh
In pvoutput.pl I changed DEBUG_SCRIPT to 1.
Is there a logfile or something for that? Where?
use constant {
DEBUG_SCRIPT => 1, # 0 = NO, 1 = YES
LIVE_DATA_URL => "http://pvoutput.org/service/r1/addstatus.jsp",
};
Here my @PVOUTPUT(replaced some with XXX's):
my @PVOUTPUT = (
{
SERIAL_NUM => "S23XXXX70",
API_KEY => "f0f750a87d25exxxaf74677ab76384d8cxxxxx1db",
SYSTEM_ID => "7XXX0",
},
);
Haha succes! Turns out that the serial number on the box is not the serial number of my inverter. Changed it in PVoutput.pl and worked instantly.
Glad you figured it out, Jacob! I'm actually surprised the serial number does anything
The serial number is actually like the password to interrogate the inverter, its critical to have this correct when the script does the initial queries to the inverter.
in pvoutput.pl it looks like its doing a check on serial number:
* # Loop through the PVOUTPUT Array of Hashes to find the matching inverter serial number
# code...
I'm looking to use the RRD database to display graphs on a web site on my RPi Zero. The scripts are working fine but I'm looking for advice on how to get RRDgraph to generate the relevant outputs in images. Most documentation on RRD does not actually explain how to get RRDgraph to process the information or how to use the various switches. If anyone can point me at some useful documents or examples I'd be grateful.
Regards
Hugh
After succesfully configured my rpi to log to PVoutput with your help; I’m now helping a friend with a similar setup. He has bought a secondhand SolarRiver 1100TL. It is missing the AC connector. Is that universal? And what is it called? So we can google it. Any ideas?
It's a "wieland" connector, probably this one:
https://www.ebay.co.uk/itm/133056896370
It's actually a Vaconn VPAC06EW-3P. And I couldnt find it anywhere online to purchase. Growatt also uses it on some inverters. Got it for free at a local Solarpanel-installer.
Hi Lucas,
Thanks for the great tutorial. I am trying to connect Pi to my old Samil inverter & uploading data to PVPutput using your code and getting below error:
Error via pvoutput.org: Bad request 400: Energy value [6700] too high for [05:08]
root@kali:/home/pi/inverter_monitor# bash runSolarStats.sh
Error via pvoutput.org: Bad request 400: Energy value [6700] too high for [05:09]
root@kali:/home/pi/inverter_monitor#
root@kali:/home/pi/inverter_monitor#
root@kali:/home/pi/inverter_monitor#
root@kali:/home/pi/inverter_monitor#
root@kali:/home/pi/inverter_monitor# bash runSolarStats.sh
Error via pvoutput.org: Bad request 400: Energy value [6710] too high for [05:12]
======================================================================
output from the fiels generated:
Starting up at 05/08/2020 04:25:53 running on linux ...
Starting up at 05/08/2020 04:26:08 running on linux ...
Starting up at 05/08/2020 04:27:33 running on linux ...
Starting up at 05/08/2020 04:27:41 running on linux ...
Starting up at 05/08/2020 04:27:44 running on linux ...
Starting up at 05/08/2020 05:08:31 running on linux ...
Initialise Serial Port... port = /dev/ttyUSB0
Send -> req init inverter: 55aa000000000004000103
Send -> req serial: 55aa0000000000000000ff
Recv confirm serial: 55aa0000000000010b5333333132384d343334010348
Recv req version: 55aa000000010103000104
Recv req param format: 55aa000000010101000158
Recv req params: 55aa00000001010400015b
Recv req data format: 55aa000000010100000101
Recv req data as at 05/08/2020 05:08:37 : 55aa000000010102000103
Recv 20200805, t => 05:08, v1 => 6700, v2 => 191 ]
Starting up at 05/08/2020 05:08:57 running on linux ...
Initialise Serial Port... port = /dev/ttyUSB0
Send -> req init inverter: 55aa000000000004000103
Send -> req serial: 55aa0000000000000000ff
Recv confirm serial: 55aa0000000000010b5333333132384d343334010348
Recv req version: 55aa000000010103000104
Recv req param format: 55aa000000010101000158
Recv req params: 55aa00000001010400015b
Recv req data format: 55aa000000010100000101
Recv req data as at 05/08/2020 05:09:04 : 55aa000000010102000103
Recv 20200805, t => 05:09, v1 => 6700, v2 => 199 ]
Starting up at 05/08/2020 05:12:29 running on linux ...
Initialise Serial Port... port = /dev/ttyUSB0
Send -> req init inverter: 55aa000000000004000103
Send -> req serial: 55aa0000000000000000ff
Recv confirm serial: 55aa0000000000010b5333333132384d343334010348
Recv req version: 55aa000000010103000104
Recv req param format: 55aa000000010101000158
Recv req params: 55aa00000001010400015b
Recv req data format: 55aa000000010100000101
Recv req data as at 05/08/2020 05:12:36 : 55aa000000010102000103
Recv 20200805, t => 05:12, v1 => 6710, v2 => 259 ]
===================================================================
Hi Jibran!
This looks like a problem on PV Output's end. Search the following page for 'Bad request 400: Energy value [energy] too high for [time]'
https://pvoutput.org/help.html#api-addstatus
It says:
> The energy parameter exceeds the 1.0-4.0kWh/kW thresholds between 6:00am and 8:00am
I'm not 100% sure what exactly this means, but as a first step, I would make sure you have configured your system size accurately on PV Output and that your PI has the correct time. If your system is configured on PV Output with a low size, it might be rejecting your updates as not being possible for your system at that time.
Hi Lucas,
Thanks for your response. My Pi time is defintely wrong. I will set it correct and test again tomorrow. Will get back to you with the findings.
Hi Lucas,
Thanks for pointing me to the right direction. It is working now :).
https://pvoutput.org/intraday.jsp?id=87746&sid=77816
Hi again Lucas. AS I said earlier, thank you very much for your help and great work done. Just wanted to tell you that I've tweaked your code to add voltage and temperature to the output:
my $panel_vol = $ARGV[5];
my $temp_deg = $ARGV[6];
my $request = POST LIVE_DATA_URL, [ d => $log_date, t => $log_time, v1 => $daily_watthrs, v2 => $current_watts , v5 => $temp_deg , v6 => $panel_vol ];
Here is my pvoutput graph :):
https://pvoutput.org/intraday.jsp?id=87746&sid=77816
Cool! Yep, any data the inverter returns can be put into the request for PVOutput's add status parameters. I left temperature out of the script for myself because it wasn't very accurate. (I think for me it was the inverter's internal temperature rather than ambient temperature).
Dear All,
I am trying to get data from my SunEzy 600E inverter. I have updated the pvoutput.pl file.
I did not know about the Serial Number of my inverter, i have seen the sticker at the left side of the inverter and seen the follwoing.
PN:9402-6020-OOP
SN:YYDDD:10013_AL007
can anyone guide me what is my inverter serial number.
currently i have having error:
Waited 2 seconds and never saw 55aa0000000000800a
noTalks=1, reInits=0.
Hi M Salman, I don't think the serial number really matters. It only matters that what you put in the script matches the serial number that you enter for your system on PVOutput.
You mention that you are using a SunEzy 600E inverter. This script is mainly for Samil inverters. Your mileage may vary on other inverters; it can work if they use the same serial communications format, but it's far from guaranteed.
Dear Lucas,
Thanks for update.
currently i am using following code to send the data in pvoutput. can you please guide me is my inverter SunEzy 600E supported for your code.
from pv import cms
inv = cms.Inverter(port)
inv.reset() # Reset all communications on the serial connection
sn = inv.discover() # Look for connected devices
if sn is None:
print "Inverter is not connected."
sys.exit(1)
ok = inv.register(sn) # Associates the inverter and assigns default address
if not ok:
print "Inverter registration failed."
sys.exit(1)
print inv.version()
param_layout = inv.param_layout()
parameters = inv.parameters(param_layout)
for field in parameters:
print "%-10s: %s" % field
status_layout = inv.status_layout()
status = inv.status(status_layout)
for field in status:
print "%-10s: %s" % field
from pv import pvoutput
api_key = 'f70ce3XXX686e94XXX1fd0c5f13a458XXXX0ae55'
system_id = 4XXX7
conn = pvoutput.Connection(api_key, system_id)
import time
status = dict(status)
conn.add_status(
time.strftime('%Y%m%d'),
time.strftime('%H:%M'),
energy_exp=status['E-Total'],
power_exp=status['Pac'],
cumulative=True)
print conn.get_status()
I don't know. I only have a Samil inverter, and I don't know if other inverters produce the same format of data over serial. You can only try it for yourself using the instructions I provided in the blog post above and see.
My script also sends the data to PVOutput, so if you are using your own code for that, it makes things more complicated.
I should also say that this script is 99% not my code. I have made it work on a Pi with some small modifications, but I'm not an expert in how it works.
Thank you for this post.
I got mine running yesterday on a Raspberry Pi Zero W (from Core Electronics) with the cheapest Ali Express RS232 to USB adapter I could find and a OTG Usb to Usb mini adapter.
https://www.klovimg.com/images/2021/03/01/image.md.png
The theory was to reduce cost down to an absolute minimum. (We'll see how it works out!)
Setting up the RS232 to USB adapter was a bit of a pain to get the drivers running but I ended up finding a post that showed me how to do install the ch341 driver on the Raspberry Pi.
https://github.com/aperepel/raspberrypi-ch340-driver/issues/3
One thing of note is that the RS232 adapter had to have it's baud rate set to 9600 by running the command:
stty -F /dev/ttyUSB0 9600 raw
I added this to my crontab so that it runs on reboot:
@reboot stty -F /dev/ttyUSB0 9600 raw
The jury is still out on how reliable these cheap RS232 to usb adapters are. I got it running yesterday for a while and then it stopped working. This morning I had to unplug and replug everything to get it working and now it has run for an hour or more no problem. I'll report back with findings on the reliability.
Also had to add usbserial and ch341 to /etc/modules text file so that the driver modules are installed at boot
Well I'm getting intermittent results from my set up. Can work for an hour or two at a time then stops, sometimes runs twice and dies. Script starts timing out waiting for a response. I don't know if it's the USB/RS232 dongle, the Pi or the inverter that is causing it.
For now I have written a batch script that checks (at 15 minute intervals) today's output log for the word "Send" in the last line, if it isn't found the Pi get's rebooted.
I think I'll just leave it like that for now.
After further research I am of the opinion that these cheap AliExpress USB to RS232 adapters have counterfeit CH341 chips in them. This makes them a bit unreliable. With my workaround scripts I am getting data for possibly 3/4 of the time and as the data is cumulative that is fine by me. Intraday values aren't that important, if it only ran once a day right at the end of the day it would be good enough for daily data.
You can see in my PVOutput data....
https://pvoutput.org/intraday.jsp?id=92659&sid=81875&dt=20210308
that it's a bit patchy but overall fine. Certainly not worth me forking out $28 for a better RS232 to USB adapter when that's about a months worth of feed in tariff.
Thanks for sharing, Mark! Yep, the data being cumulative means you only miss some specificity with the timing of your results 👍
Lucas, Thankyou for keeping the script alive.
After much stuffing around I have just got it to work. I made a change to the pvoutput.pl file and changed the URL to "https://pvoutput.org/service/r2/addstatus.jsp" to follow the API. I had changed this before I figured out it was the libwww that was missing (see below) and so kept it in there.
I also followed the instructions with cpan but also had to install libwww-perl (sudo apt install libwww-perl) as this didn't seem to be installed (Raspberry Pi OS Lite May 7th 2021) and this was causing the script to not upload. Maybe it is installed in the full desktop version (only have a 4GB SDCard on my rpi1 and Desktop wanted bigger), I am running this headless so I don't need or care about the desktop.
Hopefully this might help someone else in getting their system to work.
Final result is I am happy it is working. Woohoo.
Thanks for letting me know, Stephen! It's good to know that the script also works with the 'r2' version of the API, not only the original 'r1'.
RE libwww-perl: it's been a while since I installed this script on a fresh Raspberry Pi OS installation (Lite, Desktop, or 'Full'). I think I'm still using Stretch myself. Next time I do an install with Raspberry Pi OS Desktop I'll update these instructions if libwww-perl isn't already installed by default. 👍
No worries at all. It might be worth trying both Desktop and Lite. There may be other differences than just a windows manager.
Hey Stephen, I re-setup my Raspberry Pi today with a clean Buster install on Raspberry Pi OS Desktop.
I noticed that when I installed the Perl modules using
cpan, it installedlibwww-perlin CPAN as a dependency forLWP::UserAgent. TBH, I'm not sure what happened with your install; maybe it didn't install the module properly the first time? 🤷♂️Hi Lucas, just wanted to say that this worked perfectly today with almost no changes to your procedure. We recently bought a house with a small (2Kw) old PV system and one of these Samil inverters. Had it up and running in about 20 minutes and it just works! Thanks for keeping this page and the code fork alive for so long.
Awesome, thanks for sharing, Pat! Glad you got it working 🎉
Hi Lucas
I would like to add my thanks to you and the other contributors for this resource. I am in the UK and have a 10 year old 2.8kW system with the same classic Samil inverter and pressing the blue button was losing its novelty! Got myself a Raspberrypi and worked through your instructions with a couple of stumbles but other contributors' experience got me back on track and I have now logged an almost full day of data. Just waiting for a sunny day to see those kWh rolling in. (It's true - Brits always talk about the weather!)
Great stuff, Ali! Good luck getting all the energy you can out of the UK sky! 😉
Hi Lucus,
Has anybody successfully managed to get their Pi to use the data from a PowerPal? Probably via Bluetooth I assume!
Is this possible to upload to our PVOutput?
Just putting this out there, could be useful if possible.
Andy
Sorry Andy, no idea. If you have a solar array I'd be careful about the data that pulse meters report, because it might lack direction information https://forum.pvoutput.org/t/powerpal-optical-smartmeter-energy-monitor-pvoutput-integration/2101/2
I see your point, fair call!
I guess it really only shows my consumption from the grid, was just thinking out loud.
Thanks again for the info
Andy
Hi,
Is it possible to also link cell via the rasberry to monitor your power on inverter on cell
Thanks
Hi Deon, do you mean monitoring it on a cell/mobile phone?
This script reports to PVOutput.org, so if you have internet access on your phone, you should be able to view it.
If you mean a battery cell attached to your solar system, then no, this script has no capability to monitor battery performance/status.
I've been finding that the Pi has been dropping WiFi every now and then. This link shows you an automated way to either reboot the Pi or just restart the WiFi if the WiFi goes down.
https://weworkweplay.com/play/rebooting-the-raspberry-pi-when-it-loses-wireless-connection-wifi/
I wonder if someone can help me.
I have everything setup on my Pi and it appears to be working with my Samil Solar River 4.4KW. The data is retrieved, but it just doesn't get sent to PVoutput.
Here is the Output txt, which appears to run without an error.
Starting up at 13/11/2022 11:15:48 running on linux ...
Initialise Serial Port... port = /dev/ttyUSB0
Send -> req init inverter: 55aa000000000004000103
Send -> req serial: 55aa0000000000000000ff
Recv confirm serial: 55aa0000000000010b53343431323752343733010351
Recv req version: 55aa000000010103000104
Recv req param format: 55aa000000010101000158
Recv req params: 55aa00000001010400015b
Recv req data format: 55aa000000010100000101
Recv req data as at 13/11/2022 11:15:55 : 55aa000000010102000103
Recv <- 55aa0001000001822801250a98000d0000a84b0104007300000000000000000000001309aa138a0177000666a70000000006d9
* Data:
TEMP : 29.3 deg C = Internal Temperature
VPV1 : 271.2 V = Panel 1 Voltage
IPV1 : 1.3 A = Panel 1 DC Current
ETOTALH : 0 kWh = Accumulated Energy (high bit)
HTOTALL : 43083 hrs = Working Hours (low bit)
MODE : 260 = Operating Mode
ETODAY : 1.15 kWh = Accumulated Energy Today
HTOTALH : 0 hrs = Working Hours (high bit)
ERR_GV : 0 = Error message: GV fault value?
ERR_GF : 0 = Error message: GF fault value?
ERR_GZ : 0 = Error message: GZ fault value?
ERR_TEMP: 0 = Error message: Tmp fault value?
IAC : 1.9 A = Grid Current
VAC : 247.4 V = Grid Voltage
FAC : 50.02 Hz = Grid Frequency
PAC : 375 W = Output Power
ERR_PV1 : 6 = Error message: PV1 fault value?
ETOTALL : 2627.9 kWh = Accumulated Energy (low bit)
ERR_GFC1: 0 = Error message: GFC1 fault value?
ERR_MODE: 0 = Error mode?
Logging to: /home/pi/inverter_monitor/logs/inverter_S44127R473_20221113.csv
PVOUTPUT as at 13/11/2022 11:15:56 ...
ran: /usr/bin/perl /home/pi/inverter_monitor/pvoutput.pl 1150 375 20221113 11:15 S44127R473 271.2 29.3
I have set the cron up and that works fine here is the csv file
DATE,TIMESTAMP,TEMP,VPV,IAC,VAC,FAC,PAC,ETOTAL,HTOTAL,MODE,ETODAY,ETOTALH,HTOTALH,ERR_GV,ERR_GF,ERR_GZ,ERR_TEMP,ERR_PV1,ERR_GFC1,ERR_MODE,UNK10
13/11/2022 11:15:56,1668338156,29.3,0,1.9,247.4,50.02,375,2627.9,43083,260,1.15,0,0,0,0,0,0,6,0,0,0
13/11/2022 11:20:09,1668338409,29.7,0,1.7,247.4,50.1,386,2627.9,43083,260,1.17,0,0,0,0,0,0,6,0,0,0
13/11/2022 11:25:08,1668338708,30.1,0,2.3,248.1,50.06,563,2628,43083,260,1.22,0,0,0,0,0,0,6,0,0,0
13/11/2022 11:30:09,1668339009,31.7,0,5.1,248.9,50.02,1388,2628.1,43083,260,1.3,0,0,0,0,0,0,6,0,0,0
13/11/2022 11:35:09,1668339309,30.6,0,6.9,248.1,50.02,1563,2628.2,43083,260,1.42,0,0,0,0,0,0,6,0,0,0
I was using an ancient laptop to run Beancounter and the serial number of the Inverter was captured from that setup, and that is replicated here in this file so that must be OK. The Api key is identical and the system ID is OK, so I am bit confused as to what could be wrong. Any pointers would be very helpful
Thank you
🤔 Is there any more output after the
ran: /usr/bin/perl /home/pi/inverter_monitor/pvoutput.plpart?If not it looks like that script might not be running right. Usually it's because of a wrong serial number, API key, or system ID for PVOutput. I'd triple check these are accurate.
Other than that, check that the paths for the script on your pi is accurate; in your case, especially this one for the
pvoutput.plscript.You could also turn on debugging for that script by changing this value to
1, and try running it again to see if there's any other reason why it's not working.Hi Lucas,
Now I feel stupid!
I wrote the serial number down incorrectly and having corrected that, it now runs like a dream and I have added in the Voltage bit as well, just to complete the columns.
I can't thank you enough for providing the information and help to achieve this and rid myself of the 14 year old laptop that is about to die.
I just need to buy a Pi Zero to release my Pi4 and the project is complete,
Good Luck
No worries, LordLinhey! Glad you got it figured out 👍
Just out of interest, do you happen to know what the error code PV1 is actually reporting. I have looked for the error codes in the Inverter manual, and I can't find anything to indicate what that really means?
Mine - = 6 and I thought maybe I should investigate.
Nope, no idea, sorry. A quick Google doesn't turn up anything either 🤷♂️
Thanks Lucas for your prompt reply.
Having waded through your blog, I came to the same conclusion, so I am going to take another look to ensure the details are correct today. The sun had gone down below the horizon so there was little point in making any alterations last night.
Well, not sure why I never found this option for logging... Just like you, I decommisioned my SamilPower inverters (TL-2300). However, as the old panels are not worth anything, I decided to put 8 of them on my garage roof and keep one of the inverters. I was under the impression that the inverters had RS485 only, and somewhere 2013 I even bought RS485 driver chips but never made it to the workbench. At that time I did find the documentation for the protocol. And now, when I removed the inverters from the wall, I noticed it is plain RS232...
Long story short, I installed your script on my WS2019 box that has a physical RS232-port and after the usual bit of hassel, data was coming out of the script!
The biggest issue was the x64 support in perl for Win32::SerialPort. Changing teh .pm-file to enlarge the buffer did not work, but https://github.com/Azq2/perl-win32-serialport-fork did the job.
I changed the .sh-file to the windows equivalent and I have to set it up that it runs every so many minutes and survives a reboot, but those are details.
So I want to thank you to have the script still available in 'read only' mode.
BTW - I am using MQTT, I had to add that to the example config files (Just in case other people wonder why mqtt is not running out of the box if you use config_samilpower.ini from the configs folder. )
Oh, and just like @Michael, I also have the reconnect issue, where no data is coming from the inverter, after some attempts it is producing again. Not yet a clue why.
As Samil is bankrupt for a long time now, I guess I will be one of the last ones to install the script for the first time:).
Hi René! Thanks a lot for sharing your experience, I'm glad it's still useful! 🚀
Oh Lucas, and... Just in case somebody ends up here for this code, I think I found a few errors, or the data of your version inverter was different. Because it is strange you did not notice some of the data was weird...
It is about the eTotal and operating hours. (65536 = hex 10000)
[data_etotalh]
hexcode = "35"
multiply = 65536
measure = "kWh"
index = -1
descr = "Accumulated Energy (high bit)"
It was hexcode 12 and multiply*256.
But hexcode 12 was listed as ETOTALH, but should be HTOTALH
12 = 09 = ETOTALH = 3 = Accumulated Energy (high bit) ==> Must be HTOTALH
25 = 35 = ERR_PV1 = 16 = Error message: PV1 fault value? ==> Must be ETOTALH
I also think that in config.ini for data_htotalh the multiplier should be 65536, but did not check that yet.
I also have an issue with the MQTT, it throws a
File "C:\Program Files\Python311\Lib\threading.py", line 1038, in _bootstrap_inner
(in cleanup) Can't call method "Call" on an undefined value at lib/WinAPI/CommPort.pm line 193 during global destruction.
but I understand you have no appetite in looking into that. The mqtt data is published, so no big deal.
Hope it might help somebody.
Greetings from the Netherlands!
Another correction: multiply = 6553.6, as the low-part is in 0.1kWh, so if you now add etotalh & etotall, you get the right value in kWh with one decimal.
(I modified the code so the total is in the commandline for the python script. etotal is calculated in a couple of places, but go wrong because of what I mentioned in previous post.)